 Nothing terribly life changing today, but I wanted to share with you a little tidbit that I have been doing to make circles for some classroom signs.
Now, you are probably thinking, "WHAT? I know how to make circles! This girl is crazy trying to show me." I would probably think the same thing. But seriously, I discovered how to put circles INSIDE of circles to make some fun looking borders that will look awesome on a bulletin board.
So here is what you do.
1. Open Power Point and select the Shapes tool.
2. Select a circle and open that up onto your document. Make the outline black and have "no fill".
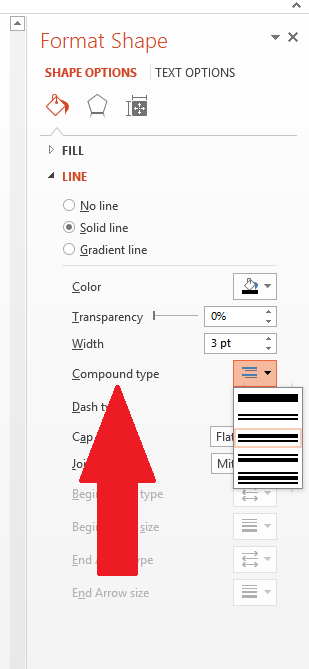
 3. Then play around with the outline. To do this, you go to the "Format" section on the top and click "Outline". A little box will come up on the side of the page that looks like this. Find "Composite Type" and, after you click it, you can choose double lines and everything! It is really fun!!
Now, here is where I became incredibly proud of myself. I figured out how to put a circle INSIDE of a circle. (Do you see above how there is an outer circle that is made of the double line and then an inside dot ring? I am going to show you how to make that now!)
4. Follow the same steps as above for the second circle. This time, though, right click on the second circle and the "Outline" bar will appear. Go down to "Size and Position". When you click that, you will be able to make the inside circle EXACTLY the right size (so it isn't lopsided and wonky!!!) Honestly, that was the best discovery I made all day. My circles are NEVER the same size when I try to do this, and now, knowing that I can make my outside circle 3" and my inside uniformly 2.8" is a HUGE discovery for me.
 |
| This is the measurement for the INSIDE circle. |
6. Finally, place a text box in the middle of the circles, and you can add a letter.
 |
| I have no idea why the top of the E cut off on the picture. It is there on my computer. So weird!! |


This is great! Thanks for teaching me. :-)
ReplyDelete-Lisa
Grade 4 Buzz
Woo Hoo! I love learning new tricks! Thanks!
ReplyDeleteI have to chuckle, only because I just got done doing circles inside circles, and I think they are a little "wonky" because I didn't know about this great trick!! Can you do the same thing in Word? or does it only work in PP? Thanks for sharing this info! Perfect timing!! ;)
ReplyDeleteJamie
Thrills in Third Grade
This may be the same thing or completely different, but I hold down the shift key when I draw my circles and it makes them perfectly round. If that's not what you were talking about, then never mind! LOL ;)
ReplyDeleteIt totally might be the same thing! Short cuts are always awesome! Off to try that now :)
DeleteLove this! I was able to do it on my Mac! It took a little longer trying to find where everything was, but I love that I can do this now!!
ReplyDeleteRachel
A Tall Drink of Water
So smart! Thank you for sharing your tip!
ReplyDeleteKelly
A View Into My Classroom
I did it! Woo Hoo! Thanks for sharing.
ReplyDeleteStephanie
Lunch, Snacks, and Recess
This comment has been removed by the author.
ReplyDeleteThanks, Stephanie! After I made my circle within a circle, I "grouped" them so I can just copy, then paste the next ones that I need.
ReplyDeleteGrowing in 5th Grade
Wonderful Tip! Thank you so much!
ReplyDelete